BreastFeeding, Pumps, Bottles, & Sippys
I've had so many new moms asking what bottles to use, or those planning on breastfeeding only, wondering why they would need any bottles at all...Because I breastfed, I looked at bottles as the way of being able to work (for even 2 hours you need to have milk available for the baby), go out on a date night, or as the supplement for days I might be sick and therefore, my body not able to supply milk like normal. If you plan to give formula at all, you need to find bottles that work for your baby as well - I never did have that experience of formula. Instead, our milk and feeding experiences went from:
- sole breastfeeding, to
- introducing the bottle filled with breastmilk (5/6 weeks), to
- combining breastfeeding, breastmilk bottles and solid foods (1st at 5 months & 2nd at 7 months), to
- introducing water in a sippy cup (bout 6-8 months)
- mixing in cows milk into the breastmilk bottle (at 1 year) and finally,
- no breastmilk in bottles, only cows milk and solid food (1st at 14 months & 2nd at 17 months)
(Sometimes, moms switch milk feeding into the sippy cup instead of a bottle, however, my kids did not like the sippy cup for milk, preferring the sippy cups only for water and juice. It seemed confusing to them and therefore, frustrating, if we switched containers for milk vs. water/juice.)
Here's what we used, how we used, and why we did what we did...
1. The Breastpump:
In America, every mom qualifies for a FREE ELECTRIC BREASTPUMP from their insurance due to the law (see https://www.healthcare.gov/coverage/breast-feeding-benefits/ for more info). When I was inquiring of this during my first pregnancy, it was the hospital I delivered at, Kapiolani Medical, that gave me the information and form to fill out during my birth recovery stay there (those first 2 days out of birth are filled with new information). Thankfully, my insurance, gave us 4 Medela brand options. Medea brand is very good, I was told by clinic staff, and the double electric was recommended to me because of the ability to pump both breasts at the same time, in the fastest time, being electric as opposed to by hand. I took the professionals recommendations:

Pump in Style Advanced BreastPump Starter Kit
This pump was soo easy to work with once you figure it out. The only difficult part may be trying to get both boobs pumping at the same time, which takes some coordination and practice. I often would only pump one breast at a time because I would leave the other breast for the baby as their feedings were frequent.
When to start Pumping?
In the first couple weeks of afterbirth. I know that sounds early (not to mention overwhelming with all the other stresses going on in the beginning of post partem), however, being able to keep up a strong enough milk supply to continue breastfeeding is half the battle, and the pump can really help in stimulating frequent milk supply. You see, the body is a learning machine, at first your breast are enormous and ready to give as much as needed to whatever hungry appetite there could be, however, the milk supply decreases as it realizes you are not using all the milk. So the more frequently you are milking, the more you body is replenishing. As you lessen the milking, so does your body. A lot of being able to keep the milk supply strong also has to do constantly resupplying your body's WATER and NUTRITION that the milking depletes.
So initially, I was pumping once a day starting about ten days after birth (once i had gotten a little bit of a routine for my child and could anticipate a time to schedule in a pump session) In the beginning, it took anywhere from 20 to 45 minutes to pump. I usually produced about 6 ounces each breast for every milking session until about six months. Every woman is different so you might not have as much and that is totally fine. When you pump, you have to be able to relax for the milk to "let down" and release out into a flow...thats what is different from the direct breastfeeding of a baby; the baby's suckle stimulates let down, while the pump's artificial tug can be less comfortable or harder to start sometimes. If the Pump is hurting you, it could be that you have the suction turned up too high, or the funnel cup is too small to contain the entire nipple and surrounding areola in the suction (as this is the way correct, non-painful breastfeeding should be, with the baby's mouth completely encompassing the entire nipple and areola). I had to start with the larger cup (as after birth i was a triple ddd cup breast) and gradually moved down to the medium size as my breast size (and weight) lessened.
Best reference for BreastFeeding I received as a gift from a friend, written by a mother with medical experience.

2. The Storage Bags & Containers
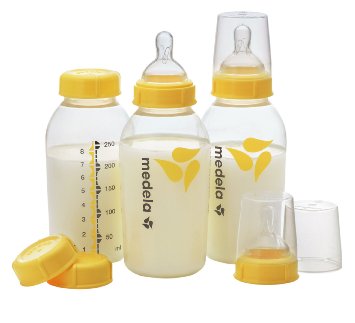
So the particular pump mentioned (all meddle brand pumps), connects into containers that can be either capped with a nipple insert as a bottle, or capped for storage in the fridge. With my daughter, we used these bottles as storage as she liked a different, slim and slanted, bottle to drink out of. With my son, we used these bottles as the bottle he fed from as he preferred this type nipple over the ones that attached to the bottle my daughter preferred.
You do not have to use these containers - I actually preferred to use storage bags because, a bag took up less space, had material to write notes on (will explain) and was cheap and disposable (while you you would have to clean each container for reuse). So how do you put the milk into the bag? Either, you carefully pour out the milk captured in the container into the bag, squeeze out the air and seal, or if its the same brand as the pump, like the Medela brand bags, you can attached the bag directly to the pump so the milk drains into the bag leaving you needing only to detach and seal.
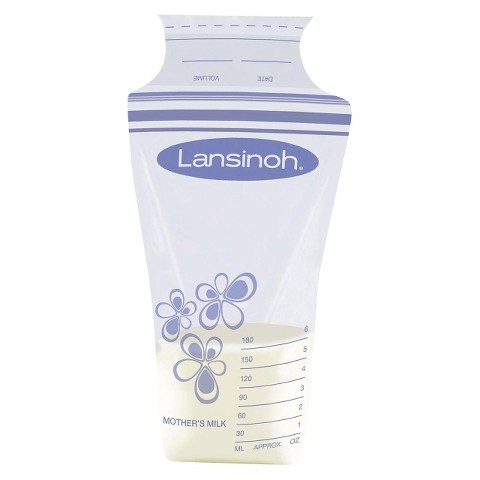
In Hawaii, you can buy these at Longs, Walmart, Target, Baby Awareness, and BabiesRUs...
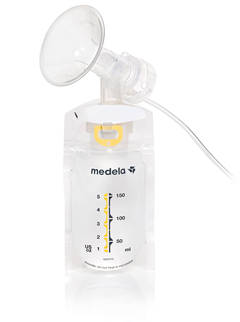
This is what I meant by the bag can attached directly to the pump, making things easier. In Hawaii, you can buy these at Walmart, BabiesRUs, Baby Emporium, and Target...
Why would you want to write on the bag?
First, you want to write on it the date of milk expressed because, you can only store breastmilk up to 5 days in the fridge or as MayoClinic.org states:
Consider these general guidelines for healthy infants:
- Room temperature. Freshly expressed breast milk can be kept at room temperature for up to six hours. However, use or proper storage within four hours is optimal. If the room is especially warm, the limit is also four hours.
- Insulated cooler. Freshly expressed breast milk can be stored in an insulated cooler with ice packs for up to one day.
- Refrigerator. Freshly expressed breast milk can be stored in the back of the refrigerator for up to five days in clean conditions. However, use or freezer storage within three days is optimal.
- Deep freezer. Freshly expressed breast milk can be stored in the back of a deep freezer for up to 12 months. However, using the frozen milk within six months is optimal.
And once a frozen milk package is dethawed, use within 24hours.
Second, you want to write the amount of milk in ounces, so you can keep track of how much your child is eating at each feeding. If your child is suddenly eating less then normal, it could be he is sick or doesn't like the taste of the milk, which means he is reacting to something you ate or your stress level. If your child is increasing in amount eating, you can prepare yourself for a growth spurt or long nights teething pain, etc.
Third, you want to write the on the bag or bottle, the name of child in cases where you have other people feeding your child. Even if its someone coming to your home where there is no other child to confuse the ownership of the breastmilk with, many people are not familiar with breastmilk and could easily be confused on which bag is what. Maybe you need to take your child to a daycare at one point, they will have many babies with breastmilk packages stored in the fridge.
3. The Bottles
We tried a few different bottles. Some, my kids liked, some they didn't. How their mouths suckle and how the mom's nipple is shaped determines the type of "nipple" they will like. The age of the baby and their ability to suck and cosumption rate determines the "flow" of the nipple type. You will see on the nipple label, "0 - 3 months" or "newborn", "4 - 12months", etc. The type of bottle shape should be easy for your child to hold - my kids did better with the shorter bottles until they could hold the bottle well on their own (4/5months mine could). My daughter liked the Playtex slanted bottles because of its "Vent-air" system which eliminated the amount of gas caused by sucking.

She spit up a lot, so eliminating the gas and irritation as much as possible was really important; that bottle seemed to be the one she had the least spit ups and could easily hold. My son only liked to drink milk in an almost-lying-down position so he liked the regular, non-slant bottles that were easy to hold in this angle. He was also very emotional and much more attached to me than my first; the bottle he preferred had nipples that really resembled my own. My daughter drank a lot more at one time, so using the longer bottles which could hold more milk, made sense. My son was eating smaller amounts but constantly, so having many smaller sized bottles made more sense for him.
4. The Cleaning of the Bottles & Pump Parts
There is so much work that goes into using pump and bottles! You have to keep all the pieces clean and sterile for the sensitive infant can easily because sick from mildew or bacteria. Not only can the milk become contaminated, but your breasts can become infected and clog-up, swell, causing headaches, fevers, and pain!
First off, do not get the electric pump wet - it will break. If a little milk splatters on there just wipe it off it use one of the cleaning wipes (examples below) do not ever soak with water.
Second, once you've pumped, you must rinse out or wash out with soap, the funnel and its corresponding parts. However, The tubes will almost never completely dry out if water gets inside. I used a special sterilization bag that microwaves your tubes and parts that was so easy!
The thing about soaps* to be careful of, many dishsoaps contain really harsh chemicals that are potential harmful to your baby. So knowing that, I would soak my used parts and bottles (with nipples, etc) in this Medela breastmilk remover soap (below) mixed with warm water in a plastic bin until I had more time to deal with it (like at the end of the day, after accumulated bottles from daycare or the sitter). Other great soaps for baby items I used were The Honest Company's dishwashing liquid and Dawn brand as it has less chemicals then other mainstream detergents.
When I was traveling or at work, I'd often have to pump in the unfamiliar bathroom of wherever I was, and be able to clean up afterwards. The Medela Quick Cleaning Wipes really convinient as they were not damp like wipes, which needs drying, but more like a soap suds swipe that easily evaporated.
Third, when ready to scrub your parts, the hardest part For me, was getting into the small areas of the tiny Nipple, conjoining piece of the pump, or the small holes in the sippy cup (next to come). Most places sell a baby bottle brush, but not all places sell these:
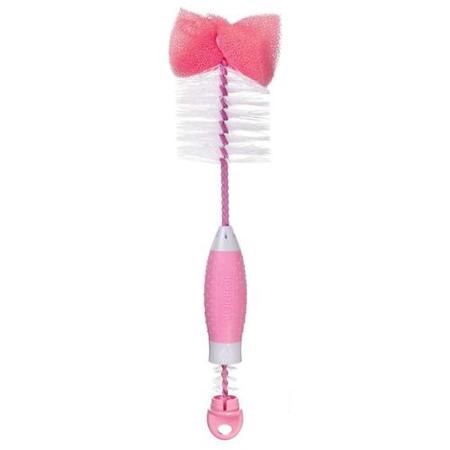
This bottle brush comes with the small twist out nipple brush (as shown coming out of the handle) is from Munchkin. I bought this at Baby Emporium, however it is sometimes stocked at Walmart. I'm sure it's sold many other places as this brand is very well known and affordable.
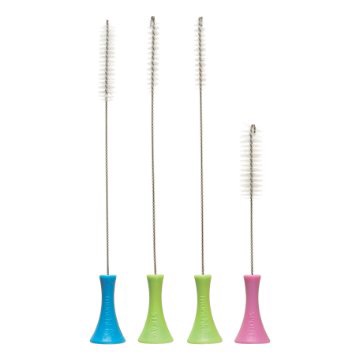
These were the biggest help in getting inbetween the inside of the niplle-cover etchings, as well as the sippy cup.
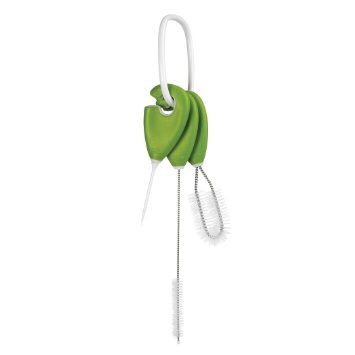
The best set of brushes I found, that gets into every nook of those bottle lids, sippy cups, and nipple ends. I bought this at Nordstrom.
Lastly, to dry out the bottles and parts, you need a breathable drying holder that can contain your small fragile parts, and allow the bottles to drip dry upside down. The problem with small bottle pieces like nipples, caps, screw tops, is that they easily get misplaced, not dried out well due to limited positioning, or easily dirtied again when drying with the regular dishes in the regular dish rack. That's why I recommend using a bottle "tree" that allows bottle to hang upside down in an angle that allows all moister to drop out properly, and small accompanying parts to fit on a raised platform of the "tree" base. This product really worked for me:

The Sprout Dring Rack from Munchkin sold at Walmart and Target of Hawaii...
I also really loved the "grass" bottle drying rack from Boon Inc as it grips your small pieces like nipples, straws, suction stoppers and handles, meaning less lost pieces. It also comes in two sizes - I prefer the skinner version as it fits easily in small spaces of the counter, window sill or sink.

Boon Grass Dring Rack sold at Baby Emporium, Baby Awareness, and Nordstrom in Hawaii...
The brush cleaners I explained of earlier were especially helpful for the small holes of the sippy cup spouts, which is otherwise almost impossible to clean out.
6. The Sippy Cup
In the early months, we used the cups with a rubber or flexible spout that was like a snobby nipple - an easier tradition from the nipple for the sucking motion. After 6 months is when any sippy cup seems to work fine. It then just became a matter of shape preference for how well it fit in her/his hands, the lunchbox, the cup holder of the car seat, etc.
A big factor I noticed with my second child, was leak ability. My son constantly tosses aside whatever food, toy, clothing no longer interests him, including the bottles. I learned that some sippys withstand better than others.

The only real cup type I avoid is the built in straw types, as they are difficult to clean if, like me, you don't always have the time to clean them right after use. Even with the brushes I mentioned, the drying process takes awhile as you cannot towel out the skinny of the straw. So if you cannot get the right ventilation, bacteria can form. I love straw types that have a thicker straw that detached easy.

These by SkipHop straw cups are soooo cute and easy to attatch to bag with a Velcro side...they also give you an extra straw insert for later (like when the sitter doesn't figure out the cup after it's been taken apart for cleaning😉). You can buy at Baby Emporium and Nordstrom.

This one by First Years is the easiest to clean and the kids had an easier time with this thicker straw then the thin straw at first. (Bought at Safeway.)